Enabling Secure Boot in eLxr 12
About This Task
Secure Boot is a security feature found in the UEFI standard, designed to add a layer of protection to the pre-boot process. By maintaining a cryptographically signed list of binaries authorized or forbidden to run at boot, it helps in improving the confidence that the machine core boot components, such as the boot manager, kernel, and initramfs, have not been tampered with.
Secure Boot implementations use the following keys:
Platform Key (PK) - Top-level key.
Key Exchange Key (KEK) - Keys used to sign Signatures Database and Forbidden Signatures Database updates.
Signature Database (db) - Contains keys and/or hashes of allowed EFI binaries.
Forbidden Signatures Database (dbx) - Contains keys and/or hashes of denylisted EFI binaries.
Before you can implement Secure Boot in your eLxr image, you must clear any existing keys from your hardware device and enroll eLxr-specific keys as described in this procedure.
Before You Begin
You must have an installed eLxr Server 12 Intel x86 ISO image. For details, see installing-elxr-on-a-hardware-device.
You must have a supported hardware device that supports UEFI Secure Boot.
For real-time kernel-based systems, you must enable the EFI runtime, which is disabled by default. To do this, add efi=runtime to the kernel command line prior to boot.
Before you create new keys or modify EFI variables, it is highly advisable to back up your current variables so you can restore them in case of error. To do this, run the following command from a terminal on the device.
$ for var in PK KEK db dbx ; do efi-readvar -v ${var} -o old_${var}.esl ; done
Check Secure Boot Status and Clear Keys as Necessary
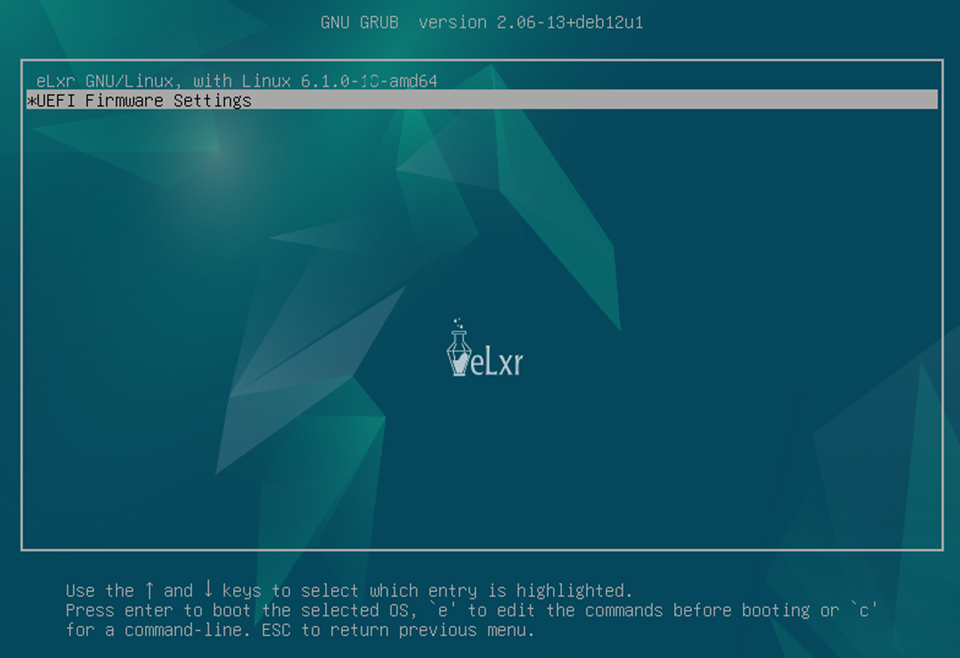
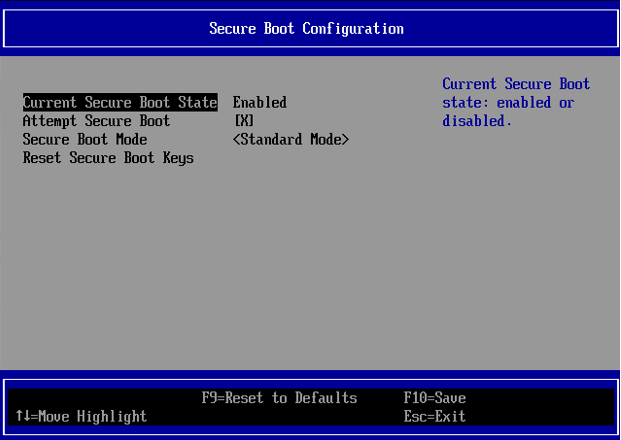
Check the Secure Boot status. To do this, restart the device and select UEFI Firmware Settings on the splash screen.
The firmware utility displays:
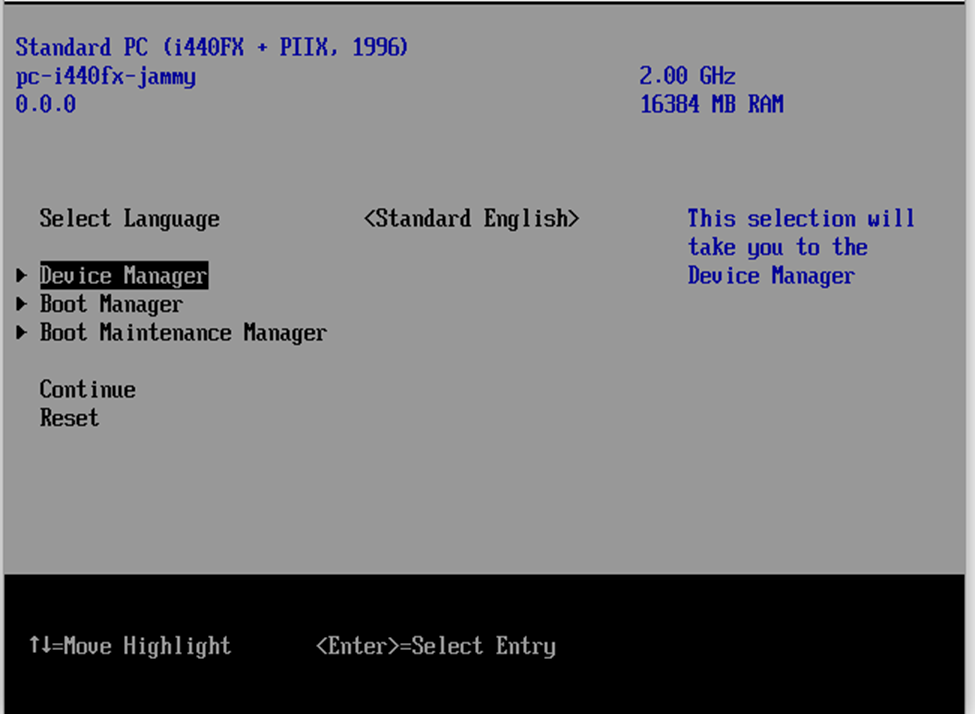
Using the ARROW keys, select Boot Manager and press ENTER to display the Secure Boot Configuration page.
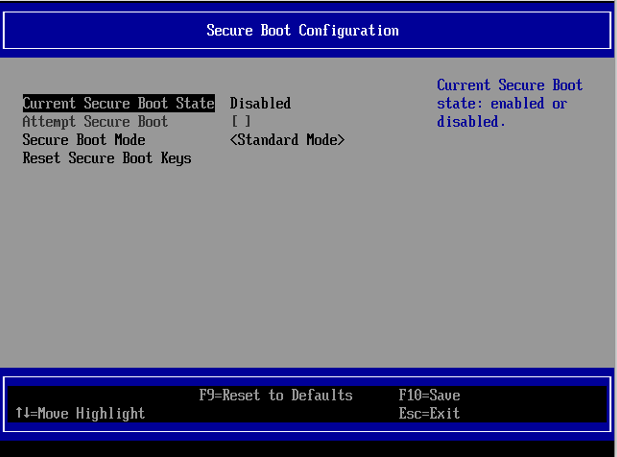
Ensure that the Current Secure Boot State is set to Disabled.
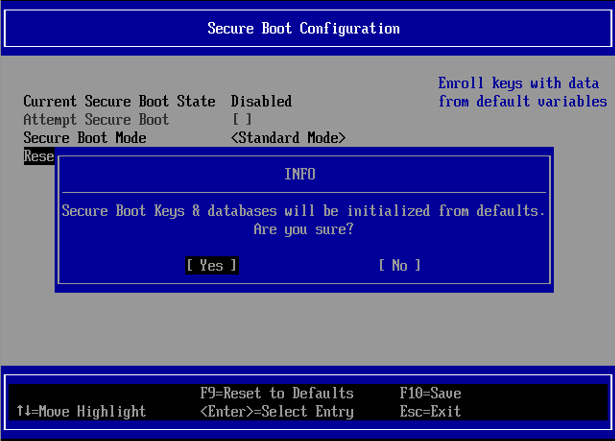
Select Reset Secure Boot Keys and press Enter, then select Yes at the prompt.
Once this completes, it will be possible to log in to eLxr and set up Secure Boot for future use.
Set Up the eLxr Image to Use Secure Boot
Log in to eLxr and verify that Secure Boot is disabled.
# dmesg | grep -i secure

[    0.000000] secureboot: Secure boot disabled
Use the sbctl tool to set up Secure Boot.
Install the sbctl tool.
# apt install sbctl
Create custom Secure Boot keys.
# sbctl create-keys

Created Owner UUID 7c9fc4ea-3c31-59d2-b785-8e696e84b39e
Creating Secure Boot Keys...
Secure boot keys have already been created!
Note
If you are running the real-time kernel, you must add efi=runtime to the kernel command line prior to boot. Otherwise, the sbctl enroll-keys command will prompt you to reset your secure boot keys.
Enroll the new custom keys with the Microsoft UEFI keys option (-m) to the UEFI.
# sbctl enroll-keys -m

Enrolling keys to EFI variables...
With vendor keys from microsoft...
Enrolled keys to the EFI variables!
Check to see if any keys require signing for Secure Boot to work.
# sbctl verify

Verifying file database and EFI images in /boot/efi...
✗ /boot/efi/EFI/elxr/fbx64.efi is not signed
✗ /boot/efi/EFI/elxr/grubx64.efi is not signed
✗ /boot/efi/EFI/elxr/mmx64.efi is not signed
✗ /boot/efi/EFI/elxr/shimx64.efi is not signed
If any files are signed, they will display in the output. The files in question reside in the ESP (EFI secure partition).
Sign all the unsigned files. Run the sbctl sign command for each file in the output from the previous step.
# sbctl sign /boot/efi/EFI/elxr/fbx64.efi
✓ Signed /boot/efi/EFI/elxr/fbx64.efi

# sbctl sign /boot/efi/EFI/elxr/grubx64.efi
✓ Signed /boot/efi/EFI/elxr/grubx64.efi

# sbctl sign /boot/efi/EFI/elxr/mmx64.efi
✓ Signed /boot/efi/EFI/elxr/mmx64.efi

# sbctl sign /boot/efi/EFI/elxr/shimx64.efi
✓ Signed /boot/efi/EFI/elxr/shimx64.efi
Sign the kernel.
# sbctl sign /boot/vmlinuz-6.1.0-40-amd64
✓ Signed /boot/vmlinuz-6.1.0-40-amd64
Rerun the sbctl verify command to view the list of signed files. This ensures that the required UEFI Secure Boot keys and files are signed and ready.
# sbctl verify

Verifying file database and EFI images in /boot/efi...
✓ /boot/efi/EFI/elxr/fbx64.efi is signed
✓ /boot/efi/EFI/elxr/grubx64.efi is signed
✓ /boot/efi/EFI/elxr/mmx64.efi is signed
✓ /boot/efi/EFI/elxr/shimx64.efi is signed
Reboot the System and Verify Secure Boot
Check the Secure Boot status. To do this, restart the device and select UEFI Firmware Settings on the splash screen.
The firmware utility displays, showing the Current Secure Boot Status as Enabled:
Press Escape to exit and reboot the device. The device should boot successfully.
Log in to eLxr and use kernel logs to verify the Secure boot status.
# dmesg | grep -i secure

[    0.000000] Kernel is locked down from EFI Secure Boot: see man.kernel_lockdown.7
[    0.000000] secureboot: Secure boot enabled
[    2.307967] integrity: Loaded X.509 cert 'Debian Secure Boot CA: 6xxxxxxxxxxxxxxxxxx'

# dmesg | grep -i secureboot

[    0.000000] secureboot: Secure boot enabled
Optionally use sbctl commands to verify Secure Boot status.
# sbctl status

Installed:     ^  sbctl is installed
Owner GUID:    7c9fc4ea-3c31-59d2-b785-8e696e84
Setup Mode:    ^ Disabled
Secure Boot:   ^ Enabled
Vendor Keys:   microsoft

# sbctl verify

   ^ /boot/efi/EFI/debian/fbx64.efi is signed
   ^ /boot/efi/EFI/debian/grubx64.efi is signed
   ^ /boot/efi/EFI/debian/mmx64.efi is signed
   ^ /boot/efi/EFI/debian/shimx64.efi is signed